
More About Graphical User Interfaces
Your program can process several different types of events. The most significant events for most programs are mouse clicks (particularly on buttons) and keystrokes. Some events are processed automatically by the widgets themselves—for example, when you click a radio button or a checkbox, its state is changed automatically without the programmer having to program any specific action. Other events include such things as mouse wheel movements, timers expiring, windows being covered up and exposed, and so on. When you're starting to program GUIs, you can ignore all but the most common events, and let the window manager handle the rest for you.
In this lesson, we'll learn how to write programs that respond to events in various ways. You already know how to read and set the values of some widgets. Now you're going to expand your knowledge and learn to create windows on the fly for common tasks like opening and saving files.
So far, we've bound event handlers to events using the command configuration option with buttons. Many widgets have a bind() method that dynamically connects a specific event type to a piece of code in a program. Sometimes you'll need to do this, because not every widget has a natural event to associate with a command configuration option.
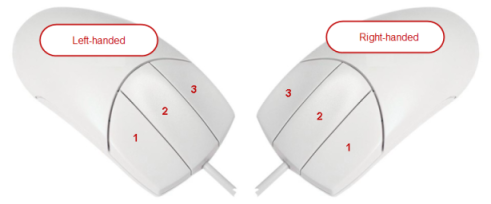
A widget's bind() method has two arguments. The first is the name of the event to be bound, and the second is the handler function to run when the event is detected within the widget. Most events are named using strings starting with "<" and ending with ">." For example, a click of the left mouse button is named "<Button-1>."
For left-handed mice the buttons are reversed, so the same button numbers apply for left-handed users:
Let's see that in action. Create a program named clickreport.py as shown:
from tkinter import *

root = Tk()

def handler(event):
    print("clicked at", event.x, event.y)

frame = Frame(root, width=100, height=100)
frame.bind("<Button-1>", handler)
frame.pack()

root.mainloop()
Save and run it. You see something like this:
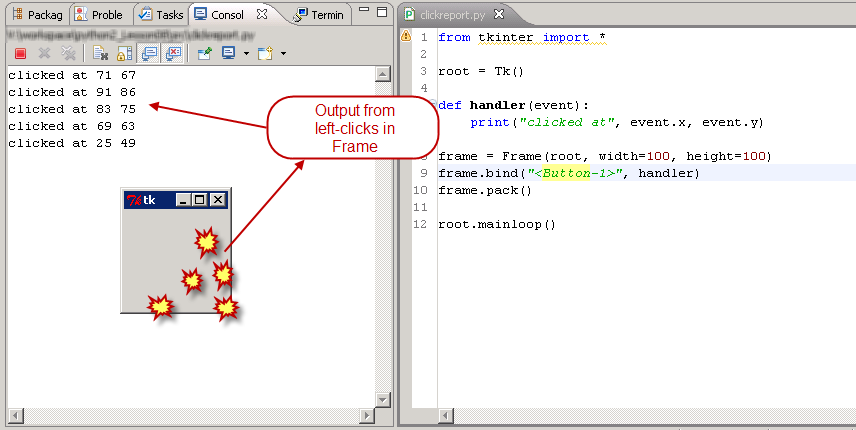
Sorry, you won't see those fun little yellow explosions, but each time you left-click the mouse button inside the frame, you'll see a report of the cursor position in the console window.
from tkinter import *

root = Tk()

def handler(event):
    print("clicked at", event.x, event.y)

frame = Frame(root, width=100, height=100)
frame.bind("<Button-1>", handler)
frame.pack()

root.mainloop()
Our handler is called whenever <Button-1> (the left button on a right-handed mouse, or the right button on a left-handed mouse) is clicked.
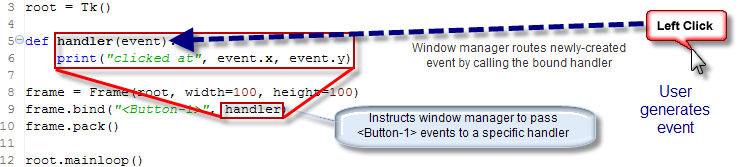
Notice that, unlike the widget command functions, a function bound using a widget's bind() method is called with an argument. This argument is an event object, and contains information about the specific event that triggered the call to the event handler. In this case, the program extracts the (frame-relative) coordinates of the <Button-1> mouse click event and prints those.
The Event object contains data about an event that has just occurred, and it is passed as a single argument to the event handler function. It has several useful attributes (some others are not listed below because they are difficult to use portably):
| Attribute Name | Purpose |
|---|---|
| widget | The widget in which the triggering event occurred. This allows the same function to handle events from multiple widgets. |
| x, y | The cursor position where mouse events occurred, relative to the top-left corner of the widget in which the event occurred. |
| x_root, y_root | The cursor position where mouse events occurred, relative to the top-left corner of the screen. |
| height, width | The new size of the widget (only set for "<Configure>" events). |
| char | The character code associated with a "<Key>" event. |
You'll need to be able to describe events when you ask tkinter to establish event bindings. As you saw in the code example above, you can capture a left-click of the mouse with the event name "<Button-1>".
You may also run in to code that uses "<ButtonPress-1>" or "<1>" as a name for the same event. These are equivalent, but we prefer the first form because it's less ambiguous. As you might expect, you can use "<Button-2>" and "<Button-3>" (and their equivalents) to refer to clicks of the middle and right buttons respectively. You can also detect double- and triple-clicks with "<Double-Button-n>" and "<TripleButton-n>" (where n is 1, 2, or 3).
You can capture "drag" events—movements of the pointer while a mouse button is held down—with <B1-Motion>, and "drop" events with "<ButtonRelease-1>" (this applies to buttons 2 and 3 as well).
The "<Enter>" event is raised when the pointer enters the screen area occupied by a particular widget, and the "<Leave>" event occurs when the pointer leaves the area.
You can capture the events that occur when the user presses particular keys, using the event name "<Key>". When such an event occurs, the event's char attribute tells you which key was pressed (unless it was a special key, like one of the arrow keys or a Shift key). Each of these keys has a special name, which can be used to bind event handlers.
The special key event names are "<Cancel>" (the Break key), "<BackSpace>," "<Tab>," "<Return>," (the Enter key) "<Shift_L>" (any Shift key), "<Control_L>" (any Control key), "<Alt_L>" (any Alt key), "<Pause>," "<Caps_Lock>," "<Escape>," "<Prior>" (Page Up), "<Next>" (Page Down), "<End>," "<Home>," "<Left>," "<Up>," "<Right>," "<Down>," "<Print>," "<Insert>," "<Delete>," "<F1>" through "<F12>," "<Num_Lock>", and "<Scroll_Lock>."
Each individual regular key can also be identified by the string containing the character it produces, without the surrounding angle brackets. So, to capture a press of the "A" key, use the event name "A". Remember that "1" is the name of the event that occurs when the number one (1) key is pressed. But "<1>" is a mouse button binding event. If your program concerns just a couple of keystrokes, it's usually easier to bind the individual keystrokes than to bind "<Key>" and then analyze each keystroke.
In a windowed user interface, you can change which widget receives keyboard input. The most straightforward way to assign focus to a widget is to click on it, although that also triggers a mouse event. These events are usually ignored by default, although buttons "expect" to be clicked on, and if a button has an associated command function, clicking on the button will cause that function to be called. Different types of widget handle keyboard input in different ways.
Entry widgets accept most characters and insert them into the value returned by the widget's get() method. A Radiobutton will only action a space, which is equivalent to selecting that widget from its associated set (automatically clearing any others in the same set). You can also change the focus by pressing the Tab key (or Shifted+Tab to move in the opposite direction).
Dialog boxes are special cases, with specific behaviors. The Enter key is equivalent to clicking the default button in the dialog (which is configured with default=ACTIVE) and the Esc key is equivalent to clicking the Cancel button.
When an event is fired by the window manager (for example, when you press a key or click a mouse button) then the event fires first in the component that is "topmost" in the window layout. So when you click a button, since the button is (usually) inside a frame, the click is sent first to the button.
Now, buttons and the other "canned" widgets are special cases, because they make sure that events upon which they take action are never seen by anything "below" them. In general though, this is not so the case. Events are normally distributed to every widget that is part of the hierarchy. So, when you click the mouse on a frame with a parent that is the root window, the click event is delivered first to the frame and then to the root window. It works the same way with keyboard events.
In our next program we'll investigate this feature. Create a new Python file named evtreport.py as shown:
from tkinter import *

root = Tk()

def handler(event):
    print("clicKeystroked '{0}' ({1}) {2} ".format"(event.char, len(event.char), event.x, kevycodent.y))

frame = Frame(root, width=100, height=100)
frame.bind("<Button-1Key>", handler)
frame.pack()
frame.focus()

root.mainloop()
Save and run it. Click inside the window, and then try pressing a variety of keys. Most keystrokes are reported. If you look carefully, you'll see that not all keystrokes have a character associated with them. (Which ones don't? It's a challenge to handle these keys in a platform-independent way, because they vary according to hardware and operating systems). If you hold a key down, the automatic repetition associated with doing this are reported as separate keystrokes (even though no physical key movement on the keyboard). If your "Caps Lock" key is like mine, it also repeats despite the lack of physical keystrokes.
from tkinter import *

root = Tk()

def handler(event):
    print("Keystroke '{0}' ({1}) {2} ".format(event.char, len(event.char), event.keycode))

frame = Frame(root, width=100, height=100)
frame.bind("<Key>", handler)
frame.pack()
frame.focus()

root.mainloop()
frame = Frame(root, width=100, height=100) creates a 100 x 100-pixel frame inside the root window. The bind() function captures all keystroke events in the frame (frame.focus() ensures that whatever the user types is captured in the frame), and passes them to the handler, which prints the keystroke received.
You can associate events with the root window of your application if you like. This is a good way to make sure that an event is trapped no matter which widget it is first presented to (so long as that widget doesn't stop the event from propagating through the widget hierarchy).
If you want to trap only certain keys, you can adjust the program so that other key presses aren't handled. This next modification will do that, handling only lower-case "o" and "k." Modify evtreport.py as shown:
from tkinter import *

root = Tk()

def handler(event):
    print("Keystroke '{0}' ({1}) {2} ".format(event.char, len(event.char), event.keycode))

frame = Frame(root, width=100, height=100)
frame.bind("<Key>", handler)

frame.bind("o", handler)
frame.bind("k", handler)
frame.pack()
frame.focus()

root.mainloop()
Now, most keystrokes don't result in any reporting whatsoever from your program. Since you bound only specific keyboard events to your frame, the handler is triggered only when those events occur.
So, what happened to the keystrokes that weren't passed to the handler? Were they not passed to the program, or were they passed to the program and then ignored? Events actually propagate back through a widget to its container, and then to that container's container, and so on, until they reach the root window, unless something specifically stops them from propagating. Many of the standard widgets driven by mouse clicks do stop the clicks from propagating; it would be pretty confusing if a button click had multiple effects! You can allow mouse events to propagate from the widgets you create in much the same way keyboard events are currently propagating to the root window of the frame.
You can see what the root window is receiving by binding events to your application's root window (which is located between the Frame and the window manager) by adding an event binding with a separate handler. Modify evtreport.py as shown:
from tkinter import *

root = Tk()

def handler(event):
    print("Keystroke '{0}' ({1}) {2} ".format(event.char, len(event.char), event.keycode))

def handler2(event):
    print("RootKeystroke '{0}' ({1}) {2} ".format(event.char, len(event.char), event.keycode))

frame = Frame(root, width=100, height=100)

frame.bind("o", handler)
frame.bind("k", handler)
root.bind("<Key>", handler2)
frame.pack()
frame.focus()

root.mainloop()
Now when you type an "o" or a "k," you see two events being reported (actually, it's the same event being reported twice). The first report comes from the Frame, and the second from the root window. Other keys are reported only by the root window because they aren't bound in the frame, so the window manager doesn't notify it about those events.
Is there some way to inhibit this propagation of events up through the container hierarchy? In fact, there is. If your handler returns a specific value, the string "break," this tells the event processing portion of the window manager to stop propagating the event. This doesn't just apply to keystrokes, as our final modification to the event reporter program will demonstrate. Modify evtreport.py as shown:
from tkinter import *

root = Tk()

def handler(event):
    print("Keystroke '{0}' ({1}) {2} ".format(event.char, len(event.char), event.keycode))
    return "break"

def handler2(event):
    print("RootKeystroke '{0}' ({1}) {2} ".format(event.char, len(event.char), event.keycode))

def handler3(event):
    print("Frame clicked at", event.x, event.y)
    if event.x > 50 and event.y > 50:
        return "break"

def handler4(event):
    print("Root clicked at", event.x, event.y)

frame = Frame(root, width=100, height=100)
frame.bind("o", handler)
frame.bind("k", handler)
frame.bind("<Button-1>", handler3)
root.bind("<Key>", handler2)
root.bind("<Button-1>", handler4)
frame.pack()
frame.focus()

root.mainloop()
Now that the first handler has been modified to return "break," you can see that the "o" and "k" keystroke events no longer propagate to the root window, so each keystroke is reported either by the Frame or by the root window.
Mouse clicks work similarly, though in those cases some clicks are reported by both widgets. Clicks in the lower-right quadrant of the frame don't propagate to the root window, because their x and y attributes are both greater than 50.
Computer users are used to seeing a menu bar at the top of a program's window. Each word on the bar will drop down a list of menu choices of varying lengths when clicked. (Eclipse's Search menu, for example, contains three items).
To add a menu bar to a window, instantiate a Menu widget with the window as its parent, and configure it as the window's menu item. Then you can add a pulldown Menu widget to the window's menu bar using the menu bar as its master and calling its add_cascade() method. Finally, you add choices to the pulldown using the pulldown's add_command() method.
Let's try it. Create a program named menudemo.py as shown:
from tkinter import *

class Application(Frame):

    def __init__(self, master=None):
        Frame.__init__(self, master)
        self.configure(height=75, width=75)
        # create a menu bar

        menu = Menu(root)
        root.config(menu=menu)

        filemenu = Menu(menu)
        menu.add_cascade(label="File", menu=filemenu)
        filemenu.add_command(label="New", command=self.callback1)
        filemenu.add_command(label="Open...", command=self.callback2)
        filemenu.add_separator()
        filemenu.add_command(label="Exit", command=self.callback3)

        helpmenu = Menu(menu)
        menu.add_cascade(label="Help", menu=helpmenu)
        helpmenu.add_command(label="About...", command=self.callback4)

        self.pack()

    def callback1(self):
        print("You selected 'File | New'")

    def callback2(self):
        print("You selected 'File | Open...'")

    def callback3(self):
        print("You selected 'File | Exit'")
        self.quit()

    def callback4(self):
        print("You selected 'Help | About...'")

root = Tk()
app = Application(master=root)
app.mainloop()
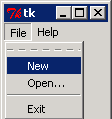
Run the program; you'll see a window with two items on its menu bar, like the one shown below. Each menu item prints out its identifying information, and the File | Exit item actually terminates the program by calling the frame's quit() method.
You can also create menu structures that display on demand. The usual stimulus for display of a so-called "context menu" is a right-click. So you can bind a <Button-3> event to the widget you want to provide the menu, and then call the menu's post() method to display it from the right-button event handler. You can extract the screen coordinates of the cursor from the event passed to the handler to make the menu display at the current cursor position. Let's give that a try. Modify menudemo.py as shown:
from tkinter import *

class Application(Frame):

    def __init__(self, master=None):
        Frame.__init__(self, master)
        self.configure(height=75, width=75)
        # create a menu bar

        menu = Menu(root)
        root.config(menu=menu)

        filemenu = Menu(menu)
        menu.add_cascade(label="File", menu=filemenu)
        filemenu.add_command(label="New", command=self.callback1)
        filemenu.add_command(label="Open...", command=self.callback2)
        filemenu.add_separator()
        filemenu.add_command(label="Exit", command=self.callback3)

        helpmenu = Menu(menu)
        menu.add_cascade(label="Help", menu=helpmenu)
        helpmenu.add_command(label="About...", command=self.callback4)

        self.cmenu = Menu(self)
        self.cmenu.add_command(label="Copy", command=self.copy)
        self.cmenu.add_command(label="Paste", command=self.paste)
        self.bind("<Button-3>", self.popup)

        self.pack()

    def callback1(self):
        print("You selected 'File | New'")

    def callback2(self):
        print("You selected 'File | Open...'")

    def callback3(self):
        print("You selected 'File | Exit'")
        self.quit()

    def callback4(self):
        print("You selected 'Help | About...'")
        print("You selected 'Help|About...'")

    def copy(self):
        print("Context command 'Copy' selected")

    def paste(self):
        print("Context command 'Paste' selected")

    def popup(self, event):
        self.cmenu.post(event.x_root, event.y_root)

root = Tk()
app = Application(master=root)
app.mainloop()
Click the right mouse button (or if you're using a left-handed mouse, click the left button) inside the program's frame; the context menu appears at the position where you clicked:
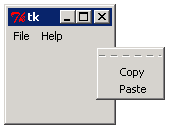
You may be wondering why menus include a dotted line across the top of them. This is a non-standard convenience feature of tkinter menus: if you click the dotted line, the menu becomes a separate window (which usually appears at the top-left of your screen) and you can make selections from the window. Below, you see the context menu from the example above, rendered as a separate window. Clicking on the selections works just as if you had brought up the menu using the right button:
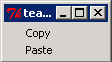
If you don't want this feature to be active in your windows, add the tearoff=False argument to the menu creation call. That way your users won't see a feature they may not understand.
The class of windows called dialog boxes share many characteristics. They are usually modal, which is to say the program behind them becomes non-responsive until the dialog box is either completed or canceled, and they are typically only displayed when a specific task needs to be performed.
Dialogs aren't usually designed to be resized, and are often laid out with the grid manager to accommodate regular rows of labeled entry fields. Tkinter provides a simpledialog module that defines a dialog class that you can subclass to define your own dialogs.
The dialog class provides a basis for extension, including two buttons to complete or cancel the dialog. As an example of dialog, we'll use a program that subclasses the dialog class to provide an indication of whether the dialog was completed or canceled by adding a result attribute.
When painted, a subclass of simpledialog.Dialog will contain two buttons: OK and Cancel. The subclass provides a body(self, master) method. This method creates widgets that are children of the master argument. It also provides an apply(self) method, which will be called only if the OK button is clicked.
The body() method sets a result attribute to a default value that indicates the dialog was canceled. Then the apply() method sets an indication that the OK button was clicked. The dialog is modal, which means that the main program will not be given control until the user dismisses the dialog. This only happens when the user clicks OK or Cancel. The code that creates the dialog can look at the result immediately afterwards, and determine whether the dialog should be considered valid.
Enter the code below as dialog.py:
from tkinter import *
from tkinter.simpledialog import Dialog

class MyDialog(Dialog):

    def body(self, master):
        self.result = None
        for r in range(5):
            for c in range(5):

                b = Button(master, text="Row {0} Col {1}".format(r, c))
                b.grid(row=r, column=c)
        print("Dialog created")

    def apply(self):
        self.result = "OK"

class Application(Frame):

    def create_dialog(self):
        d = MyDialog(self)
        print(d.result)

    def create_widgets(self):
        self.d_button = Button(self, text="Dialog...", command=self.create_dialog)
        self.d_button.pack({"side": "left"})

        self.QUIT = Button(self, text="Quit", fg="red", command=self.quit)
        self.QUIT.pack({"side": "left"})

    def __init__(self, master=None):
        Frame.__init__(self, master)
        self.grid()
        self.create_widgets()

root = Tk()
app = Application(master=root)
app.mainloop()
Save and run it. Click Dialog.... You'll see a window like this:
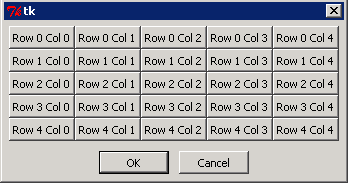
You can resize the dialog, but its contents don't respond to this activity. If you click OK, the apply() method is called and "OK" prints in the console. If you click Cancel, "None" is printed.
tkinter provides a number of dialog boxes already programmed for specific purposes. The first set is imported from the tkinter.messagebox module. They all take a title and a message argument, and you can follow those with further keyword arguments to tailor their appearance and behavior:
| Dialog Name | Appearance |
|---|---|
| showinfo | 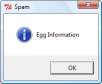 |
| showwarning |  |
| showerror |  |
| askquestion | 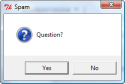 |
| askokcancel | 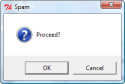 |
| askyesno | 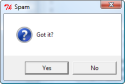 |
| askyesnocancel | 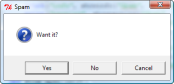 |
| askretrycancel | 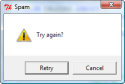 |
The keyword arguments available to use include default, which specifies the button selected if the user presses Enter. The button options are: ABORT, RETRY, IGNORE, OK, CANCEL, YES, or NO. These constants are defined in the tkinter.messagebox module along with the dialogs.
You can also set the icon keyword argument to ERROR, INFO, QUESTION, or WARNING, depending on which graphic you want to include with the message. You can set the type argument to be: ABORTRETRYIGNORE, OK, OKCANCEL, RETRYCANCEL, YESNO, or YESNOCANCEL.
The askcolor dialog, from the tkinter.colorchooser module, allows you to tell your programs the color you want something to be. It normally returns a two-element tuple; the first element is a tuple of RGB values, the second is a string representing the color format used for web content (#RRGGBB). If you cancel the selection, both elements of the tuple are None.
The filedialog module provides support for selecting directories and files. With files, filedialog supports either loading (providing the selected file exist) or saving. With modules, dialogs will display tkinter's limitations. We'll see filedialog in action in our last example of this lesson. Create dialogdemo.py as shown:
from tkinter import *
from tkinter.filedialog import LoadFileDialog, SaveFileDialog, Directory
from tkinter.colorchooser import askcolor
from tkinter.messagebox import (showinfo, showwarning, showerror, askquestion,
                                askokcancel, askyesno, askyesnocancel, askretrycancel)


class Application(Frame):

    def askdir(self):
        d = Directory(self)
        print(d.show())

    def messages(self):
        print("info", showinfo("Spam", "Egg Information"))
        print("warning", showwarning("Spam", "Egg Warning"))
        print("error", showerror("Spam", "Egg Alert"))
        print("question", askquestion("Spam", "Question?"))
        print("proceed", askokcancel("Spam", "Proceed?"))
        print("yes/no", askyesno("Spam", "Got it?"))
        print("yes/no/cancel", askyesnocancel("Spam", "Want it?"))
        print("try again", askretrycancel("Spam", "Try again?"))

    def file_open(self):
        d = LoadFileDialog(self)
        fname = d.go("nosuch.txt", "*.py")
        if fname is None:
            print("Canceled...")
        else:
            print("Open file", fname)

    def file_save(self):
        d = SaveFileDialog(self)
        fname = d.go("example", "*.py")
        if fname is None:
            print("Canceled...")
        else:
            print("Saving file", fname)

    def color(self):
        d = askcolor()
        print(d)

    def createWidgets(self):
        d_button = Button(self)
        d_button.config(width=12, text="Directory Test", command=self.askdir)
        d_button.pack(side=TOP)

        m_button = Button(self)
        m_button.config(width=12, text="Messages Test", command=self.messages)
        m_button.pack()

        c_button = Button(self)
        c_button.config(width=12, text="Color Choice", command=self.color)
        c_button.pack()

        l_button = Button(self)
        l_button.config(width=12, text="Open File", command=self.file_open)
        l_button.pack()

        s_button = Button(self)
        s_button.config(width=12, text="Save File", command=self.file_save)
        s_button.pack()

        self.QUIT = Button(self)
        self.QUIT.config(width=12, text="Quit", fg="red", command=self.quit)
        self.QUIT.pack(side=TOP)

    def __init__(self, master=None):
        Frame.__init__(self, master)
        self.pack()
        self.createWidgets()

root = Tk()
app = Application(master=root)
app.mainloop()
Save and run it. You'll see a window with various buttons:
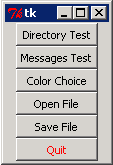
Click the buttons for examples of the filedialog uses we talked about.
And there you have it! This concludes our discussion of the tkinter library. Next up—Databases! See you there!